[et_pb_section][et_pb_row make_fullwidth=”off” use_custom_width=”off” width_unit=”on” use_custom_gutter=”off” custom_padding=”0|0″ padding_mobile=”off” allow_player_pause=”off” parallax=”off” parallax_method=”off” make_equal=”off”][et_pb_column type=”4_4″][et_pb_text admin_label=”Text – first published” background_layout=”light” text_orientation=”left” use_border_color=”off” border_color=”#ffffff” border_style=”solid” custom_margin=”0||0|” custom_padding=”0||0|”]
Article first published at Estella Goh, link: http://estella.sg/hdb-bto-singapore-defects-checking/
[/et_pb_text][/et_pb_column][/et_pb_row][et_pb_row][et_pb_column type=”4_4″][et_pb_text admin_label=”Text – Blog post” background_layout=”light” text_orientation=”left” use_border_color=”off” border_color=”#ffffff” border_style=”solid” custom_margin=”0|||” custom_padding=”0|||”]

We purchased premium flats from HDB but the contractor that built our estate did a pretty bad job for many of the units.
I know of people who rather accept all defects existing, then have their contractor do up whatever necessary in order not to delay the renovation process but personally, eye glaring defects are not something I would accept.
Our defects check and rectification was completed in a little less than 3 weeks – very short time, considering that defects rectification normally takes 2 weeks for each round. I didn’t do everything “right” right away and there were things I would have done differently if I had known earlier so here’s a sharing of the experience for information.
THE DEFECTS LIST
Upon key collection, you will be provided with a set of form (see below for sample), to fill in with a list of defects spotted in your new home. The number of defects you have is really a matter of luck but for a start, please ask for more or you’d end up photocopying on your own.
The period for submitting a defects list was 7 days from key collection for my estate. Be sure to check what is the period for your estate.
DEFECTS CHECKLISTS
There are defects checklists available on the internet. You just need to do a search for them, print them out and you can check for defects on your own. I found one checklist quite comprehensive and here’s the link to it (note: I found it on the internet, click at your own risk).
DIY OR HIRE A SPECIALIST
We tried for 2 X half days and gave up, because we couldn’t follow instructions on the checklists very well and the apartment was too hot and stuffy for us to be able to stay in with Joy for long periods. Our other main concern was that we would not know how to spot defects that have more permanent / serious consequences. However, if you can set aside 1-2 full days and can withstand stuffy conditions in that duration, you can consider doing the defects check on your own.
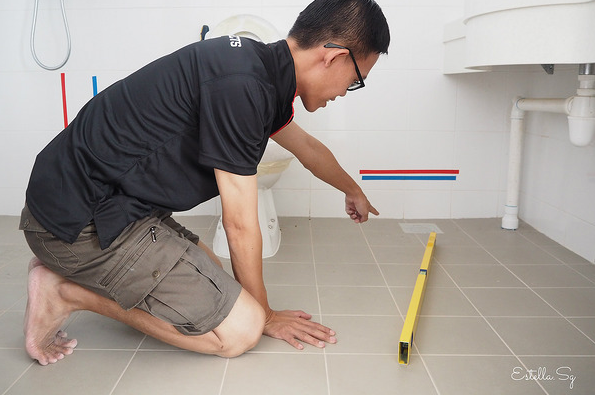
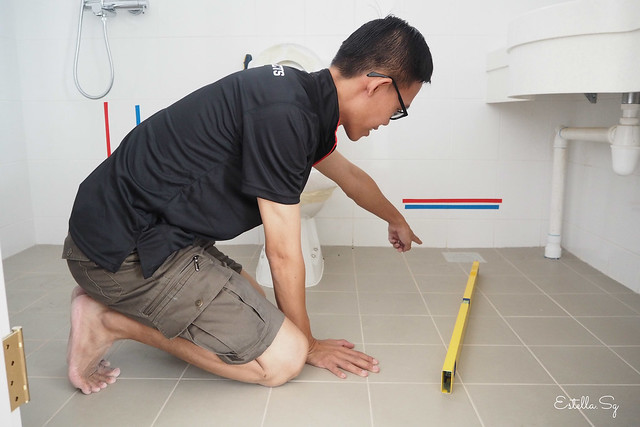
Here are some of the checks performed by our defects specialist / the defects spotted for reference.


I’m pretty lucky that there are no super major defects. The ones that are more important to me are the following:


And here’s the full list of the defects we reported. If you’re going to DIY, you can check out the wording used.


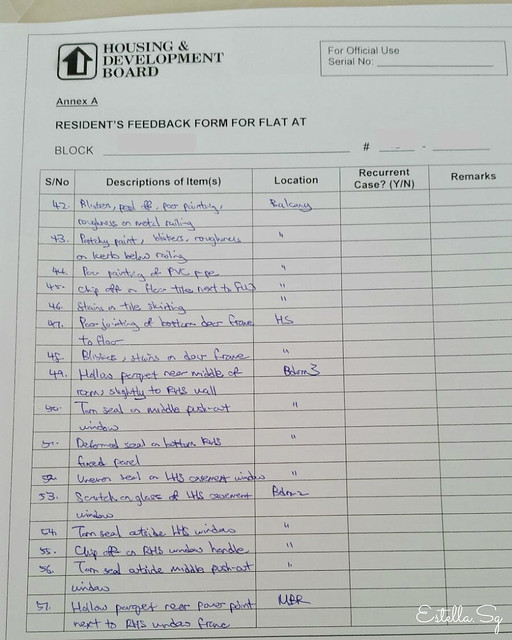

We added a 70th defect on our own for leaking piping outside the apartment at the place where you can adjust the water supply.
OUR DEFECTS CHECK SPECIALIST
The defects check specialist we hired is Wee Kuang from Absolute Inspection. Wee Kwang is a BCA Scholar and was formerly the deputy director at BCA (Building & Construction Authority). If you want to know more about him, you can read this. If you’d like to engage Absolute Inspection, you can check out details here.
In the course of working with Wee Kwang, I found him to be detailed and practical. Where there were defects that can be overlooked for reasons, he would inform me and I’d make the call. Wee Kwang spent 6 hours alone in my home checking defects, while I was away having my brows touched up at Browtisan and running other errends. I definitely appreciated the convenience.
He sent photos of the defects list to me and the next day I submitted the list as owner of the flat.
THINGS I HAVE LEARNT FROM DEFECTS CHECKING / RECTIFICATION
- DO NOT use masking tape on your walls to mark defects. You can use it on your floors but not your walls.
 Buy these colored post it tapes from Daiso for $2. You can even color code the defects by using specific colors for important defects, so that its easier for you to go over them again at the 1st joint inspection.
- Some defects, such as a missing rubber seal on the kitchen pipe can be overlooked because when the sink is installed, you wouldn’t need it anymore.

- True story, some defects can be worst after rectification. My neighbours ended up with holes in their timber floors after they reported hollowness in them. What the parquet sub-contractor did was simply to fill them up, leaving behind unsightly holes in the floor.
- Some defects rectification can be done simultaneously with your renovation, so you don’t necessarily have to wait for all rectifications to be completed before commencing renovations. Just make sure it’s written down and agreed between yourself and BSC will do.
- BSC is not your enemy, even if they do push back on matters. Talk to them nicely and treat the workers well. I left drinks in my bomb shelter and made sure to always treat supervisors / workers with respect and courtesy.

- I can’t say this enough – it’s really important / useful that you link up with your future neighbours on Facebook to keep each other updated. I got to know of the rectifications which some neighbours managed to get corrected and then pushed BSC to do the same for us.
Disclosure: Wee Kwang extended a discount to me for services rendered. No other compensation was received.
[/et_pb_text][/et_pb_column][/et_pb_row][/et_pb_section]